Building an IoT Pet Feeder with ESP32 and AWS

When i started this project in June 2025, the goal was to build something interesting that would let me apply my FastAPI learnings in a real-world scenario. But more importantly, i wanted to create something actually useful - not just another tutorial project that gets forgotten after two weeks.
After working on it intermittently over several months - with breaks for hardware deliveries and other priorities - i now have a working smart pet feeder that costs me around $1.80/month to run on AWS. It’s not perfect, but it works, and i learned a lot building it.
Why this project
This project brought together several things i enjoy working with: Python, AWS, and automation. It was also my first real contact with AWS Amplify and IoT Core - services i’d heard about but never actually used in production.
While i had previous experience with hardware projects using an Orange Pi PC for simple automations, the ESP32 was a better fit for this project. It’s smarter than Arduino with more GPIOs (34 pins!), has built-in WiFi with no need for an external antenna, includes NVS (Non-Volatile Storage) memory for saving configurations, and it’s compact enough to fit in a small enclosure - not overkill like an Orange Pi or Raspberry Pi would be for this use case.
The technical stack
The project uses a full AWS serverless stack:
Backend & Cloud:
- AWS Lambda (Python 3.13) with FastAPI framework
- AWS IoT Core for MQTT communication
- DynamoDB for feed history, schedules, and configuration
- API Gateway for REST API endpoints
- Cognito for user authentication
- EventBridge for scheduled feed execution
Frontend:
- AWS Amplify for hosting and CI/CD
- Vanilla JavaScript with TailwindCSS
- Real-time status updates via polling
Infrastructure:
- Terraform for infrastructure as code
- GitHub Actions for automated deployments
Hardware:
- ESP32-WROOM-32U microcontroller
- MG90S servo motor for dispensing
- HX711 load cell amplifier with 1kg sensor
- LEDs for status indication
- Physical push button for manual feeding
Communication:
- MQTT over TLS for ESP32 ↔ IoT Core
- REST API for frontend ↔ backend
Serverless architecture deep dive
The backend is built entirely on AWS serverless services, eliminating the need to manage servers and enabling automatic scaling. The stateless architecture means Lambda functions don’t retain data between invocations - everything is stored in DynamoDB.
Lambda functions:
- API handler - FastAPI application serving RESTful endpoints for feeds, schedules, users, and device configuration
- IoT message processor - Receives MQTT messages from ESP32 via IoT Rules and stores them in DynamoDB
- Schedule executor - Triggered by EventBridge cron rules to execute scheduled feeds at specific times
DynamoDB tables (PAY_PER_REQUEST mode):
feed_events- Complete feed history with timestamps, weight deltas, and event attributionfeed_schedules- One-time and recurring feed schedules with timezone supportdevice_config- Remote configuration for servo timings, weight thresholds, and feed cyclesdevice_status- Real-time device state (online/offline, current weight, feeder state)schedule_execution_history- Audit trail for scheduled feed executions
EventBridge integration: When a user creates a daily feed schedule (e.g., “Feed at 7:00 AM”), the system creates an EventBridge rule with a cron expression. At the scheduled time, EventBridge invokes the schedule executor Lambda, which publishes an MQTT command to the ESP32 via IoT Core. This eliminates the need for a continuously running scheduler - the infrastructure only activates when needed.
IoT Core & MQTT protocol
AWS IoT Core serves as the central message broker, handling all communication between the ESP32 device and cloud services. It’s a fully managed MQTT broker that scales automatically and requires zero server maintenance.
Why certificates instead of passwords: IoT Core uses mutual TLS (mTLS) authentication with X.509 certificates rather than username/password authentication. When provisioning a new device, AWS generates three files:
- CA certificate (
AWS_CERT_CA) - Amazon’s root certificate authority, validates the server - Device certificate (
AWS_CERT_CRT) - Unique device identity, signed by AWS - Private key (
AWS_CERT_PRIVATE) - Secret key that only the device knows
During connection, both the device and AWS IoT Core authenticate each other:
- ESP32 verifies it’s connecting to real AWS servers (not an imposter) using the CA cert
- AWS verifies the device identity using the device certificate signed by AWS
- Private key proves the device owns the certificate (never transmitted over the network)
This is far more secure than passwords - certificates can’t be brute-forced, and each device has unique credentials that can be revoked individually if compromised.
MQTT publish/subscribe model: MQTT is a lightweight pub/sub protocol designed for constrained devices and unreliable networks. Instead of direct device-to-server requests (like HTTP), devices publish messages to topics and subscribe to topics to receive messages.
The ESP32 firmware subscribes to command topics on startup:
mqttClient.subscribe("petfeeder/commands");    // Remote feed triggers
mqttClient.subscribe("petfeeder/config");      // Configuration updates
When a user clicks “Feed Now” in the dashboard, the backend Lambda publishes to petfeeder/commands:
{
  "action": "feed",
  "feed_cycles": 3,
  "requested_by": "user@example.com"
}
The ESP32 receives this message via the onMqttMessage() callback, parses the JSON, and activates the servo. After dispensing, it publishes the result to petfeeder/feed_event with weight measurements.
How the ESP32 handles MQTT:
Connection with retry logic:
// Setup TLS certificates
netMqtt.setCACert(AWS_CERT_CA);
netMqtt.setCertificate(AWS_CERT_CRT);
netMqtt.setPrivateKey(AWS_CERT_PRIVATE);

// Connect to IoT Core with exponential backoff
mqttClient.begin(AWS_IOT_ENDPOINT, 8883, netMqtt);
mqttClient.setKeepAlive(30);  // Send ping every 30s to detect disconnects

if (mqttClient.connect(THING_NAME)) {
  mqttClient.subscribe("petfeeder/commands");
  mqttClient.subscribe("petfeeder/config");
}
Publishing telemetry (every 30 seconds):
StaticJsonDocument<256> doc;
doc["current_weight_g"] = getWeight();
doc["feeder_state"] = "idle";
doc["uptime_seconds"] = millis() / 1000;

char buffer[256];
serializeJson(doc, buffer);
mqttClient.publish("petfeeder/status", buffer);
Receiving commands (non-blocking callback):
void onMqttMessage(String &topic, String &payload) {
  StaticJsonDocument<256> doc;
  deserializeJson(doc, payload);

  if (topic == "petfeeder/commands") {
    const char* action = doc["action"];
    if (strcmp(action, "feed") == 0) {
      int cycles = doc["feed_cycles"] | 3;  // Default 3
      activateFeeder("api");
    }
  }
}
The firmware uses non-blocking patterns - the main loop() calls mqttClient.loop() to process incoming messages without blocking servo movements or weight measurements. Connection drops trigger automatic reconnection with exponential backoff (1s, 2s, 4s, 8s) to avoid overwhelming the network.
Architecture
The system follows a serverless event-driven architecture that separates concerns between hardware, backend, and frontend:
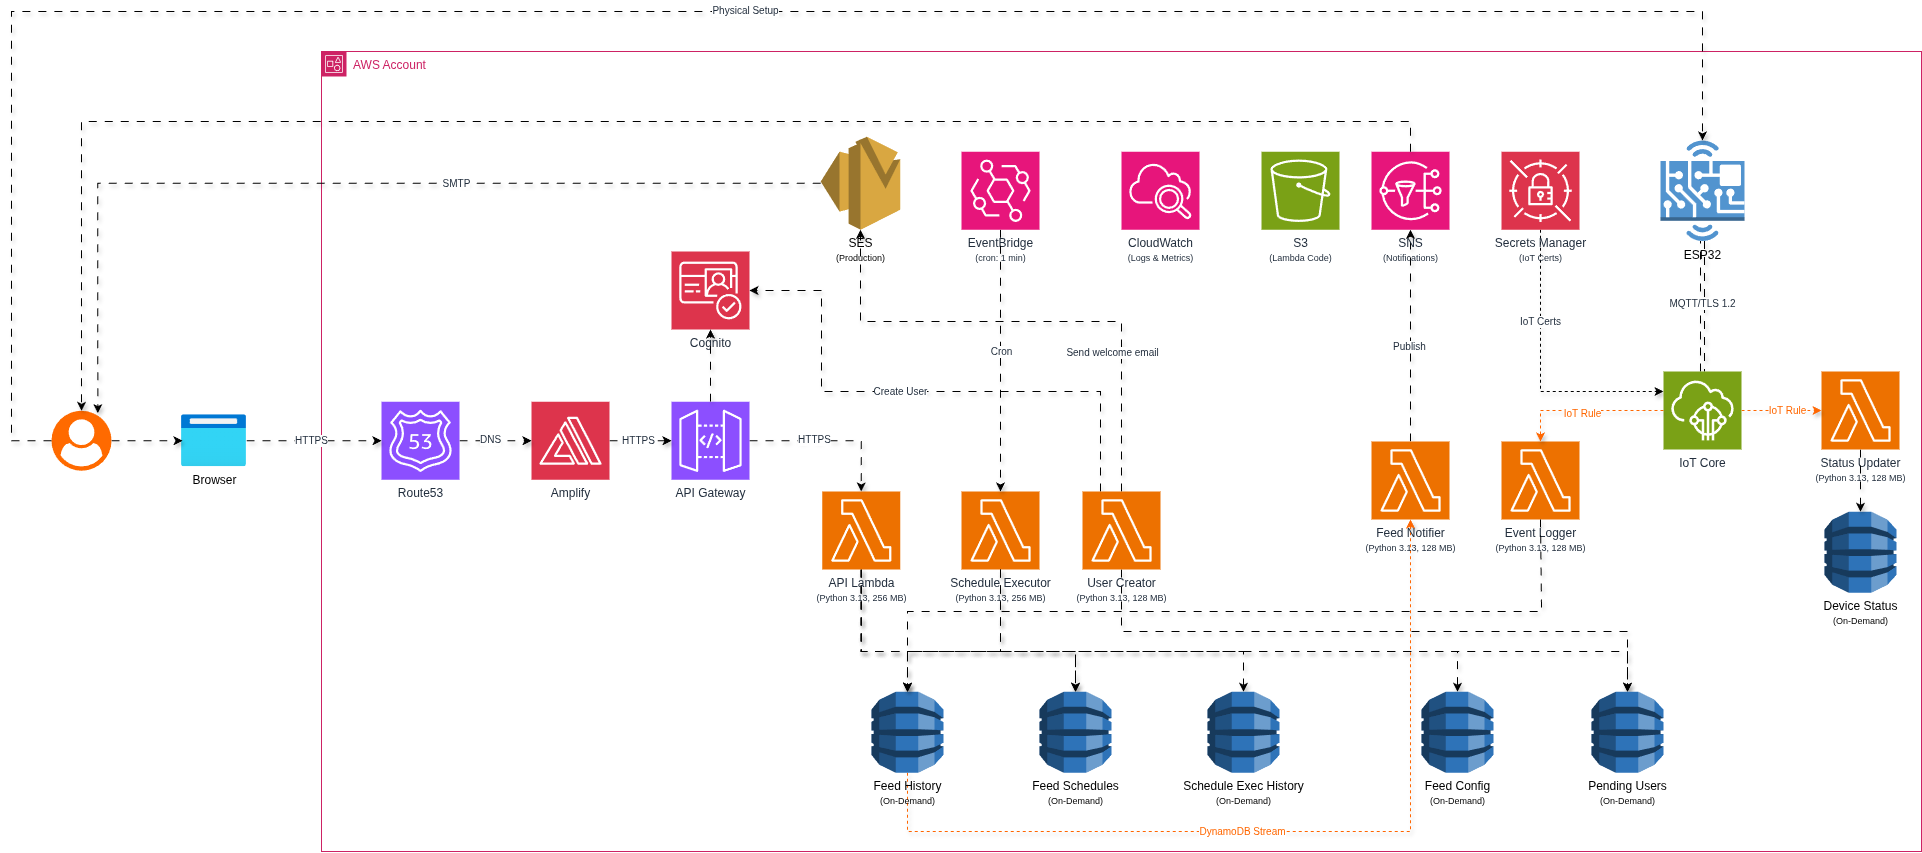
MQTT communication flows:
Device → Cloud (telemetry):
- ESP32 publishes to
petfeeder/feeds/{feed_id}when dispensing food - ESP32 publishes to
petfeeder/statusevery 30 seconds with weight and device state - ESP32 publishes to
petfeeder/refillwhen detecting human refills - ESP32 publishes to
petfeeder/consumptionwhen pet eats
Cloud → Device (commands):
- Lambda publishes to
petfeeder/commandsto trigger remote feeds - Lambda publishes to
petfeeder/configto update device settings without reflashing
IoT Rules engine: AWS IoT Core uses SQL-based rules to route MQTT messages to appropriate destinations:
SELECT * FROM 'petfeeder/feeds/#'→ Lambda function → DynamoDB feed_events tableSELECT * FROM 'petfeeder/status'→ Lambda function → DynamoDB device_status table- Messages include automatic timestamping and error handling via CloudWatch alarms
RESTful API: The FastAPI backend exposes a comprehensive REST API through API Gateway with JWT authentication via Cognito:
Feed management:
POST /api/v1/feeds- Trigger immediate feed (publishes MQTT command)GET /api/v1/feed-events- Retrieve feed history with pagination and time filteringDELETE /api/v1/feed-events- Clear all feed history (admin only)
Schedule management:
POST /api/v1/schedules- Create one-time or daily schedule (creates EventBridge rule)GET /api/v1/schedules- List all schedules for current userPUT /api/v1/schedules/{id}- Update schedule (recreates EventBridge rule)PATCH /api/v1/schedules/{id}/toggle- Enable/disable scheduleDELETE /api/v1/schedules/{id}- Remove schedule (deletes EventBridge rule)
Device control:
GET /api/v1/status- Real-time device status (online/offline, current weight, feeder state)PUT /api/v1/status- Update device status (used by frontend for testing)GET /api/v1/config/{key}- Fetch configuration valuePUT /api/v1/config/{key}- Update configuration and publish to ESP32 via MQTT
User management:
POST /api/v1/users/request-access- Self-service signup with admin approval workflowGET /api/v1/users/pending- List pending access requests (admin only)POST /api/v1/users/approve/{id}- Approve user and send welcome email via SESPOST /api/v1/users/reject/{id}- Reject user requestDELETE /api/v1/users/{email}- Revoke user access
All endpoints require a valid Cognito JWT token in the Authorization: Bearer <token> header. The API includes comprehensive OpenAPI documentation accessible at /docs.html (Swagger UI) and /redoc.html (ReDoc).
Email notifications: AWS SES (Simple Email Service) sends transactional emails for user management and feed events:
- Welcome emails with temporary passwords when admin approves new users
- Feed notifications when scheduled or manual feeds complete (opt-in via SNS subscriptions)
- HTML-formatted emails with branding and instructions for first-time setup
The ESP32 stores configuration in NVS (Non-Volatile Storage) memory including servo timings, weight thresholds, and feed cycles. These can be updated remotely via MQTT config messages, eliminating the need to reflash firmware for configuration changes.
The challenges
The biggest technical challenges weren’t about getting things to work - they were about making things work reliably.
Timing calculations: Getting the servo movements right took time. Food needs to be dispensed smoothly without getting stuck, but the servo can’t move too fast or it jams the pipe. i ended up implementing precise timing: capturing weight measurements at SERVO_OPEN_HOLD_DURATION_MS + 500ms to get accurate delta calculations before the pet starts eating.
Network resilience: The ESP32 needed robust retry logic for both WiFi and MQTT connections. Connection drops shouldn’t result in lost feed events or stuck states. i implemented automatic reconnection with exponential backoff and proper state management to ensure feeds always complete, even if the network hiccups mid-operation.
Weight tracking accuracy: The HX711 load cell needed careful calibration and noise filtering. i added a 3-second stabilization delay before recording weight changes to prevent false detections from vibrations or the pet bumping the bowl.
Smart event detection: Not every weight change is a feed event. i implemented logic to distinguish between:
- Feed dispensing (servo activation)
- Pet consumption (gradual weight decrease)
- Human refills (weight increase with container on scale)
- Container placement (weight increase from < 5g - just the user putting the bowl back after cleaning)
Current features
The feeder is fully functional with:
- Remote feeding - Trigger feeds from anywhere via authenticated web dashboard or direct API calls
- Automated scheduling - One-time and daily feeds with timezone support, managed by EventBridge cron rules
- Real-time weight tracking - Load cell monitoring with automatic consumption detection and refill alerts
- Email notifications - SES-powered transactional emails for user approvals and feed events (opt-in)
- User management - Self-service signup with admin approval workflow and email-based onboarding
- Feed history - Complete audit trail with timestamps, weight deltas, and event attribution
- Device monitoring - Real-time status (online/offline, current weight, feeder state) via MQTT telemetry
- Physical control - Manual operation via push button, works offline if WiFi drops
- API documentation - Interactive Swagger UI at
/docs.htmlfor testing endpoints and exploring the schema - Secure authentication - AWS Cognito with JWT tokens, role-based access control (admin vs regular users)
What’s next
This is the first version, and there’s room for improvement:
Hardware refinement: The servo-based dispensing mechanism works but food gets stuck frequently in the pipe. i’m considering a different mechanical design - maybe an auger system or a better pipe angle.
PCB design: Right now everything is on breadboards with jumper wires. i want to design a custom PCB and solder everything properly. This should eliminate power noise issues and make the whole system more stable.
Machine learning: With all the feeding data being collected (timestamps, amounts, consumption patterns), it would be interesting to implement ML to get insights about the pet’s eating behavior. Things like: optimal feeding times, portion adjustments, or detecting changes in eating patterns that might indicate health issues.
Cost breakdown
Running on AWS costs me an average of $1.80/month for typical usage (3 feeds per day), including:
- Secrets Manager: $0.80
- Route53 hosted zone: $0.50
- DynamoDB, Lambda, IoT Core, API Gateway, Amplify, CloudWatch: ~$0.30
- Tax: $0.20
- Total: ~$1.80/month
AWS Free Tier covered most costs during the first year of development.
What i learned
Building this project taught me way more than i expected:
ESP32 development - My first project with this microcontroller. Learning about GPIO configuration, interrupt handling, non-blocking code patterns, and power management.
MQTT protocol - Working with pub/sub messaging, QoS levels, retained messages, and building reliable IoT communication.
AWS IoT Core - Thing creation, certificate management, MQTT topics, IoT Rules for routing messages to DynamoDB, and device shadows.
Serverless architecture - Designing stateless Lambda functions and optimizing for cost and performance.
Hardware integration - Calibrating sensors, dealing with electrical noise, understanding servo control, and the importance of proper power supply.
State machines - Implementing robust state management for servo movements (CLOSED → OPENING → OPEN → CLOSING → CLOSED) with precise timing.
AWS Amplify - Setting up CI/CD pipelines, managing build configurations, and deploying static sites with automatic invalidation.
The entire infrastructure is provisioned using Terraform, making it easy to replicate the setup or tear it down when needed. This approach to Infrastructure as Code ensures consistent deployments across environments.
Resources
If you’re thinking about building an IoT project, my advice: start with something you’ll actually use. The motivation to fix bugs and improve features is way higher when your pet’s dinner depends on it.